October 26, 2015

Little Black Marker

This site has been up and running pretty consistently since 2007. That's kind of amazing to me. In all that time, I have not taken the time to explain where the name comes from. Figured now is good a time as any.
the actual LBM in question
During my semester in Rome in college, we spent a lot of time traveling. Go figure. As I was studying German, our class spent a few days of immersion time in Germany. Once of the things I was excited to do was shop at a KaDeWe. It's like a giant department store, but unlike ours in the states its not just clothes, shoes and appliances... Not wanting to come back home with a ton of stuff I got a few small things, in this case, a tiny black permanent marker. I used it throughout my time in Europe and have kept it since then.

While I was in Rome, I started doing short comics based on some of our experiences, both exciting and daily life. I had thought that perhaps I would keep doing them and make it into something, but it never really got off the ground.
I had longer hair then.
I designed myself and tried to get caricatures of the people that I hung out with established.
not sure why this is the answer.
In total there are only about 10 short comics, in various stages of completeness. Figured I would share a few here. Most are inside jokes from our time in Rome.
Joanne and I sunbathing on campus.

the cycle of exhausted study and overwhelmed travel

some girls thought the teachers were hot

our RA was kind of a nut

the famous gelato incident

random d&d story
Looking at these is just another reminder of the progression of skill over time. A lot of time.
Keep working on yourself.

October 19, 2015

My Personal Logo Design

For the next few posts, I am going to talk a little bit about some of my more recent design work, then I have no doubt I will get back into crochet.
I realized my personal design and logo has changed a bit since my last post on it way back in 2007.
I like to think that it is a good representation of where I was to where I am now, especially skill wise. 

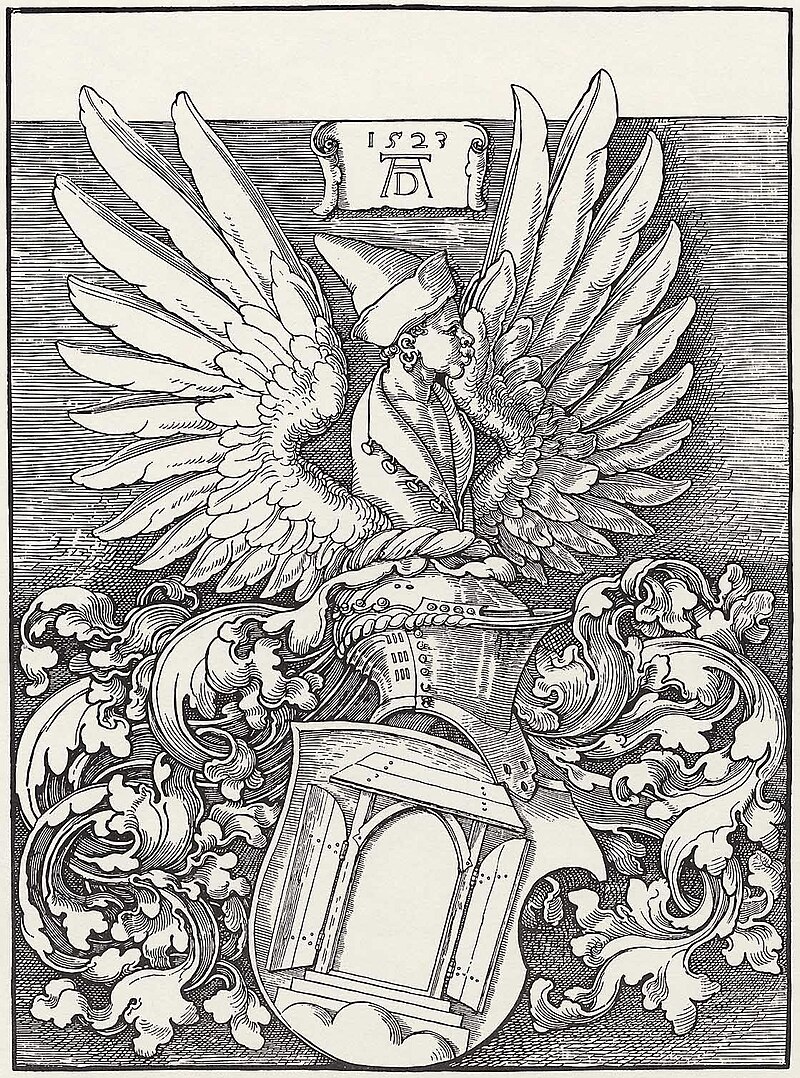
I've been using what I call my "fish mark" since college when I needed a quick and easy way to sign my work in ceramics and printmaking. I'd been studying Albrecht Duerer, particularly his wood cut prints, and liked his signature a lot. It's that AD thing at the top under the date.

For a very short time I tried to replicate Duerers, but with my initials. It was too much of a rip off though, so I worked on it and realized that turning it on its side I could make it look like a fish! That's where I got the first one in the old post. That first one was a scanned drawing that I tried to clean up in photoshop.

Since then I've done a lot of work in the field of graphic design. The current logo is constructed in Illustrator. The AS of the fish was made from a font I liked, can't remember which anymore, that I heavily modified to get the shapes of the letters where I wanted them. When the logo is large like this, it is also easy to see that the lines around making up the pentagon shape are actually tools that represent my skills. Specifically these are: a pencil, brush, tablet stylus, crochet hook, and a black marker for my site name.

These tools are also represented in the argyle background on this site, with an emphasis on the little black marker, for my sites namesake, but that's next week's post.


It is really nice to have a good logo to represent myself. And like all logos, it might change again in the future, but for now it's a great way to see my past. Been thinking about getting a decal for my car... could be cool.

October 12, 2015

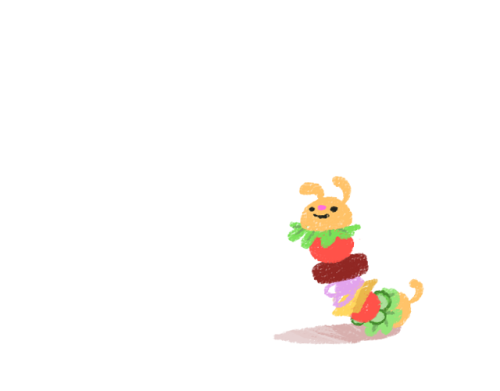
Burgerpillar Dog

Today is part two of the hamburger related crochet projects. This project is based on this hamburger-doggerpillar drawn by Nora that I saw on tumblr one time. One look and I knew I wanted this thing to exist and be poseable.
The shapes for this guy weren't too hard to figure out, but they are a bit more "elements of themselves" than hamby-chan's anatomy. By that I mean each piece is a distinct section, for example, a whole tomato, not just a slice, a giant burger vs, a patty, etc. It's what helps make it be a doggerpillar.

I used some of the same colors as Hamby-chan, plus purple for the red onion, pink for the nose, and a slightly more orange bun color. I also used a 4mm hook and the 12mm safety eyes. I kind of figured out the shapes as I went along. Every segment is attached to the one before it by using the back and front loops of single crochet strategically.

Starting at the head I made the ears in line with the bun piece since I wanted him to be as few pieces as possible. I've done the same sort of thing for Fish the Boxtroll's ears. I left a decent sized tail where I started his head so that I would have something to attach the spine to when I put it in later.
Since I wanted him to look as similar as possible to the sketch, the first lettuce leaf I even embroidered with a little of a second green to get those leaf veins.
Tomato is next. This one is actually a little larger than the second one that comes later. At the end I felt it was too large, but I didn't want to go back and redo it once I was so close to being done.
You can see that I'm stuffing as I go along. The patty came next and I tried to use back and front loops to get an edge to the piece. Later I went back with the brown and wove thread up and down through the piece, around the center, to make it more into a patty shape and be less puffy.
The red onions were next. I actually did these twice, but didn't like how the first ones came out. To get the kind of stringy look, on the last row around I simply chained a bunch and tacked them down with single crochets. I went around about three times using up free spots in this way to get onion strings of various lengths. Think it came out pretty cool looking.
Here you can see I added the cheese on. Personally I think I would want more cheese on my hamburger doggerpillar, but again, staying on model this is where it came. It was a little tricky figuring out how to make my round shape into a square-ish piece of cheese that I could keep working from.
The second tomato is only one row shorter than the first, but I think it makes a better shape. Again, I didn't figure it out till down here and I didn't want to go back and try to fix the first one. Under this second tomato are the pickles! I had a little bit of a hard time figuring out that is what they were since all I really saw in the picture was the dark green outline and I thought it was bell pepper or something. Pickles makes more sense. I used the green from the first lettuce embroidery to make them and then went and added a darker green border for the rind of the pickles.
After the pickles there is a second leaf of lettuce which I left plain since the pickles covered most of it. With that second lettuce done there was only the butt bun left to make so I started working on the spine. You can see it sticking up out of his head and out the back as well.
The rudimentary spine is made from using aluminum floral wire from the craft store. I estimated out two full body lengths of the wire and then folded it over and twisted all the way down to get it double thick. This also made a loop on the top that I could use the tail the head to attach through the loop. I twisted it closed around the yarn and pulled the end to get it to retract into the head.
I found an old sock and filled it with those plastic beads that weight stuff down; you could use rice or beans I guess. Once the bean bag was ready I started on the butt bun. I did about half and worked the tail then after I did the first row of decreases I set the bean bag into the shape as it was forming. I wrapped the end of the wire spine around it to help keep it in place. I was hoping this would help weight the end down and let him sit up a bit on his own, but it didn't really work for that. It does help keep the spine in place though so that is good.
Finally he was done! Personally I love this guy. He is super cute and happy looking. Now that I have a pattern for all the pieces, I feel like I could make a ton of these with different amounts and arrangement of toppings and segments. This is a great stash buster too (if you make a ton of em). You could easily put a rattle or squeaker in these too... so many good ideas here.

Nora took a look and loved it when I shared it on tumblr. So happy to make others smile. :)

Difficulty: Easy +
Time to complete: 8 hours or so
Finished size: 13 inches long, each piece about 3.5 in wide

October 5, 2015

Hamby-Chan

After the last few things I've made, I wanted to do something silly, yarn consuming, and less ambitious. I've had two burger related crochet projects in my Evernote crochet notebook for a while. So this post will be part one of these two posts. I must be watching too much Food Wars anime...

First step is getting all the yarn colors together. A quick rummage through my yarn stash and I found most of the colors I would need: Soft white for the inside of the bun, green lettuce, red tomato, orange cheese, brown patty. I went out and picked up a skein of Bernat Satin in Sable for the bun since I wasn't too happy with the tans in my stash. I used a 4mm hook for this little burger.
purple and white is red onion on part two actually...
I know Nerdigurumi called hers Hamburger-kun and it is her pattern after all, but I'm naming mine Hamby-chan. Once I had the colors assembled the pattern was pretty easy to follow.

I am not sure I really get the slip stitch row at the end of the top bun part. I mean I got how to do it and I guess it works ok, but I kind of think you could just work into the back loops to get the same sort of thing. I also think I would arrange the "toppings" differently if I made this again. The tomato section being between the lettuce and the cheese makes it a little hard to see.

I used 12mm eyes as those are the ones I have the most of. I also embroidered a few "sesame seeds" in soft white to the top as well. The cute cheek blushies just put it over the top. Finished Hamby-chan is about 5in in all directions.

Looks good enough to eat! Maybe... if it wasn't so cute...
Kinda odd to think I went from hating hamburgers in high school, to loving them now. What's your favorite burger place? Think mine are Five Guys, Moo-yah and Hopdoddy.

Time to complete: about 6 hours because I was lazy, bet you could knock it out in three
Difficulty: Easy

September 28, 2015

Pochi Rickman

I'm a pretty big fan of anime and anime movies. Ghibli for sure, but lately G-Kids has been distributing some stellar animated movies. They first came across my radar when a friend introduced us to Summer Wars. I was obsessed with that movie for months and it remains one of the few I keep on my giant iPhone6+ at all times. Then I picked up a movie called Letter to Momo in a Target on a whim and loved it. After visiting a local indie theater, we saw they were doing a G-Kids summer event showing films. This gave us a whole new list of movie titles to hunt down and one of the first that stood out to us was called Welcome to the Space Show.

This movie is on iTunes right now and is described as "surpassing Star Wars in scale". Yeah. After watching the trailer I cannot say that I had any idea of what the heck was going on and it was a pretty refreshing feeling. Seems like a lot of trailers just show you the whole movie! All I knew is that the animation looked cool, it had a voice actor I love, and a space dog. That was enough.

The movie is a little long (2.5 hrs), and is one of those you will want to pause often to take a look at all the stuff going on in the frame. Some parts are visually overwhelming which balance nicely with the quiet scenes. It starts in a pretty standard anime movie setting of a small town school in the summer, then takes you to an amazing space port, then back to a very earth looking planet just long enough for you to get comfy with what you are seeing, then throws you back into a crazy alien smorgasbord battle royale!

The main character is Pochi Rickman. He happens to be a very dog looking alien and is a darling character. My husband said he's like a space dog Indiana Jones. He was so endearing to me, I kind of immediately knew I wanted to squish him for real. That feeling was only enforced when I took to the internet and saw that there is NO merchandise for this show. Nothing on Etsy even. The market has let me down. With that in mind, I of course turn to my skills and since sewing is not one I have, crochet it is!
pochi sketches to figure out the shapes
His colors are tricky I think. Sure it looks like all you need is black and white, but really?? Nope.
While I dislike Red Heart yarn, they had a color that was the only one in the store even close to what I wanted. Most "white" yarn looks a little yellow to me. Most "off white" or "eggshell" colors also really end up like dirty tea-stained doilies... not the right color either. I had some coupons so I bought a Red Heart Super Saver Jumbo skein in Soft White. I also noticed that his nose is a darker black than his ears and paws. That meant that I could use normal black yarn I had on hand for his nose and needed to find a "dusty" lighter black. The only one I liked enough to get was a Caron One Pound of yarn in "black". Held next to any other black yarn and it's easy to see its a little lighter, though. Also, just FYI, I used almost an entire 32 oz bag of polyfil for this guy, so be aware he takes a lot.

His head shape was nice and easy, as it is a large cylinder. I then made an oval snout about half as long and affixed it to the front of the face. His nose was next and I tried to make it a nice triangle shape that I could add a little stuffing under. I followed that with the eyebrows and then the ears. Finally I used the dark black yarn of the nose to embroider a smile. The head alone took about two weeks of work to get the shapes right and assemble.
ear and eyebrows

assembled head
I'm using a 5mm H hook for Pochi, but I think I got a little ambitious with the size of him. I did not intend to make him life-size, but after finishing the head, that seems to be what happened. I guess if you wanted to make one yourself, you could follow my pattern, but maybe with a thinner yarn and a 4.00 mm hook to make a more reasonably sized Pochi. I thought about ripping it out and starting over, but certain family members said his head was too cute and perfect and that I shouldn't...

So, I made the body next. Since he's just a big white bean shaped dog, I could mess with the shape as I was making it, without needing to worry about changing colors or doing too much detail. I kept holding it up to the head to try to get an idea if it was right or not. Gave him a bit of a wide butt and tapered it up to the neck to match the head opening so it was easy to sew together.

After the body was done I made a quick tail which was a super easy shape. Then, I was able to start work on the arms and paws which were the most challenging. I started at the paw and worked up to the shoulder. I tried a few different paw shapes, but I settled on making a large oval and embroidering the separations between each finger. I left a large hole in one side of the paw that I then came back and added a thumb on to.

After that I did the fore arm and upper arm, and I tried to use strategic increases to give him a bit of an elbow joint shape. Then I had to figure out how to reverse my pattern to do the other arm so they both bend the right way and have the thumbs facing in. Also one arm is all white and the other is half white/half black and it was important to make sure I got them right.

Next was the legs, thank goodness they are the same. No thumbs to worry about and the same color scheme of half and half. These I made in three parts. First, an upper thigh round shape tapering from wide at the hip to a bit smaller at the knee. Second, a "transition cylinder" shape to join the upper leg to the paw and lower leg at the right angle. And third, the paw and lower leg piece. It was hard to tell if I was making it too big or small, so I had to go ahead and just commit to finishing one and see. I thought it looked ok so I went on to making a second.

It was about this time that I remembered that I never used the recordable voice box I bought for Groot since I was never able to get a clear sentence out of the film. So I dug it out and with some expert pause/play action from my husband, we were able to get a fairly good recording of him introducing himself early in the film.

The recording says "My name is Pochi. I'm from planet Wan-Bau in the Animal Stellar Region."
Since the only thing I had not yet finished was this one leg it went into his foot. I tried to keep it in the middle of the foot so I would still have room in the front to embroider his toes, but keep out of the heel where it would be harder to activate. Once the box was in the foot/lower leg section I was able to stuff up and finish the second leg.
its all in the details
With all the limbs done I used a little pink paint to add paw pads to his hands and feet, as well as inside the ear. Then it was time to add his eyes to his face. I used felt and tried to get the shape just right. I made a base plate to sit the pupil on to get that anime eye look. The tiny perfect circles were made with a hole punch, which only works since this felt is really stiff.

Finally I had to tackle attaching the limbs to the body. I had a few thoughts on this. Originally I had planned to just sew them on in place, but then I had the idea to use a button to make a kind of spoke and washer through the shoulder so it could move around a little. Looking at how much yarn and fluff I would have to get through to make this work I didn't think it was the best solution. Plus they would be seen and that would ruin all the work I did to make him look right. Wandering around my local Joann Fabrics I saw these giant 30mm snaps and realized that they might work out well... I could pose his arms and legs at will with these! I used white crochet thread to attach them to the limbs and body and snapped them into place.

Unfortunately I did not like the finished look when I tested it out on one arm. There was a ton of space between the arm and body where the snap was and you could see it quite easily. It did allow for movement at the shoulder, but the arm was way to heavy for the snap to keep it posed in any way. So I went back to basics and just sewed them in place.

Done! Pretty on model I think.

I never thought I would make another plushie as large as Blathers is, but as as you can see he is, in fact, larger. If less complicated to make. Pochi does resemble K.K. Slider a bit, you know?

Difficulty: Intermediate
Time to complete: 80 hours to experiment, write and make from scratch
Finished size: 22 inches from butt to ears. 29 inches tall "standing" up

Note: As with Lion, I have written out his pattern, but sharing it would make this post even longer. Email if you want a copy to try out.

September 21, 2015

Octopus Puzzle Ball

One of the crochet bloggers I like to follow, AllAboutAmi, had a post a while back about an amish puzzle ball she made for her daughter. Pretty cool by itself, no doubt, but she mentioned that they had other animal shaped ones and after taking a quick look, I fell in love with the octopus one. The pattern is free on Ravelry and is by Dedri Uys of Look at What I Made.

I've got about half a skein of my favorite Mandala colorway from Madeline Tosh on hand, leftover from my baby otachi and I thought it would be an excellent octopus coloring. I'm pretty sure it is a DK weight yarn. I decided to use it for accents in the head and do the body and the rest with a Bernat in Aqua which I found on super clearance at the local Joann's.

Knowing that the Mandala yarn is a little thinner I used a 4.25mm hook to do the wedges parts of the head, that would make sure they weren't too small to match up to the larger yarn pieces. I was a little worried that I would not have enough of the mandala to do all 12 of the wedges, but somehow I managed... Each took about 10 minutes to make (x 12) for a total of 2 hours for the wedges.
wedges
I then went down to the 4.00mm hook as the pattern calls for for the wedge lids, as well as the rest of the pattern. The two wedge lid chains took about an hour each. After that it took another two hours to attach the lids to the wedges, stuff and close off the two body rings.
finished body rings
Once I had two rings done, I started into the head. The mouth is first and I used a little bit of what was left of the mandala yarn for the mouth, with a little bit of white scrap for the teeth/beak. After that you start on the head proper making a cone and after a bit you add the mouth in to the bottom and then work the tentacles out from there. It's a really cool technique to be able to make this all in one big piece.
mouth piece
After that it is a matter of working the four remaining wedges, head and a three lid chain together into another ring, this one with an octopus head on it! I think I did it backwards from they way they did but it made sense to me and it ended up with the same result, so it was fine. Took me about half an hour to attach, stuff and finish off the head and ring.


For the eyes I decided to go with buttons as well. I have found that using crochet thread (like for doilies) is a great way to attach buttons to crochet. It is much thicker than regular thread and is much sturdier, but will also fit in a yarn needle and most button holes and it is easy to find in white and black.


Once they were on, the octopus was done! Pretty cute. He's about 17 inches long from tentacles to top of the bulb part of the ball itself. I had fun making him, but he is for sale.

Difficulty: Easy
Time to complete: about 7 hours

September 14, 2015

Dapper Gray Wolves

Got a commission for a little wolf man. Prompt was that he be a gray color, with a white shirt, red tie and black vest. As the request came from one of the recipients of the Mr. Skeesbears, she figured I could modify that construction for this project. Shortly after we started discussing, she decided she wanted a girl wolf companion for him, like the pair of kitties I made in the past. The girl would be styled with a black dress and red belt.

If you recall, both the Skeesbears and the Kitties were based off a monkey pattern I purchased from Pica Pau Yan. On her site, I found an image of a wolf she made that seemed to be of the same style. The monkey base pattern is pretty versatile. I sent her an email since her Etsy store is still empty of patterns, asking if I could purchase the wolf pattern, but never got a response. From the pictures I was able to see about how it should be done, so I set to work.
wolf (or gray fox?) on the right here.
For this project, I had the white, red and black yarn on hand for the details. I bought two skeins of Vanna's Choice in Silver Gray for the rest of the bodies, a pair of 18mm safety eyes for the girl, 15mm safety eyes for the boy, and some more polyfil stuffing. Hook used will be a 5mm H. (One day I will buy a fancy one from BQueen Collection.)

Since I have made this pattern at least 6 times now, it's a no brainer, except that the nose, ears and tail will be different. Half a brainer then? Anyway. Of course I jinxed myself. I got through the head, made up a nose pattern and got some ears made. Went to assemble the head before moving on and realized that the head was almost twice as large as the last monkey I made, which I still have on hand. WTH.
MASSIVE mistake
While ripping it all out, meditating on what went wrong, and the not-so-correct looking nose shape, I realized that I made these in the past with a 4mm hook. Oops. That accounts for the massive size increase. Think this yarn is a tiny bit heavier as well than the last one I used, but thats the way it is with most 4 weight yarns as it is a broad category.
better.
I started over with the correct 4mm G hook size and it came out much closer to the right size. I also reworked the nose pattern to be a bit more gradual of an increase and once I had it on I knew it was better. You can also tell that the eyes look much more in proportion to the head this time. This one is the boy of the pair and I used 15mm eyes for him. (The girl will have 18mm eyes.)

I reworked the ears as well and added them on, as well as embroidering the smile, before moving into the body. White shirt, black pants, gray feet sticking out at the end. I'm always sure to use the back loops for color transitions as it makes an nice edge and gives the illusion that it is on top of the body color. Same for the arms. With the main body assembled and finished, I moved on to the girl. (Yes, I know, the tails on both will be the last thing I make.)

The girl pattern is just the same as the boy. Started with the head, added the larger eyes for cuteness sake. Made up another nose and set of ears. Moved into the body and started with the top of her black dress. Then when I got to the legs area, I decided to give her bloomers like I had with the lady kitty. Seems like people look up skirts on dolls out of curiosity, so I had to address it. Cant have her " going commando". Switch colors back to gray for the legs and feet.

Then I went back and added the skirt over the bloomers. After that I embroidered the belt on. Wanted to make her a little girlier so I added a tiny red flower as well by an ear.

After that it was tail time. I put it off because it made taking pictures as I went along, easier without them though. Kept the same gray and white nose coloration on the tails as well and kept them kind of bushy. I moved a few rows around from the tail section of a husky pattern by Sylvia of Studio Ami to get the tail shape right for these two.

Final touches was to add the vest on to the boy, complete with button. And add light cheek blushies with a little fabric paint.

Done!
Difficulty: Intermediate
Time to Complete: 45 hrs for the pair