June 30, 2015

Mandala of Thoughts

Quick, unexpected post today. 

A story came across my feed today and I felt I needed to join in with Mandalas for Marinke.

I must admit I hadn’t heard of her blog until more recently. I've come across it in the past. Lovely free patterns, a few stunning ones on Ravelry too. Seeing today's post, I went and checked out her site again. Her blog is so full of color and life. It is hard for me to see it and think that this bright person is gone from the world. I may not have known her, but I can see the rippled effect this is having on so many crochet bloggers, friends and family. 

As a person who struggles with my own negativity, crochet helps me to feel productive, useful and creative when my mind is plaguing me with thoughts to the contrary. Thinking about the work I have made for others is a touchstone that I can return over and over. I’ve used it as a tool for my own calm and recommended it to others I know with depression. I know how soothing working on a pattern can be. 
front
I’ve been thinking about her all day. A kindred spirit. A creative being. Gone. 

I made this as a thank you for the many patterns, stories, and posts she shared. A few hours and my thoughts are all I can send, but I hope that joined by many others, it will help those who remain.
back
I want to thank you all who read my blog for being an inspiration for so many projects. For your encouraging words and comments.

I am here for you.

June 29, 2015

Rainbow Striped Nightcap

After deciding that socks were not happening, I started looking around for a new idea of what to use my striping yarn for... For some reason I have been toying with the idea of making a nightcap... you know, those old-timey hats that people wear to sleep in, like Ebenezer Scrooge has in Muppet Christmas carol.

As a lot of nightcaps are striped, I figured it might be cool to see how the skein would turn out as a hat. The shape and diminishing size would also result in stripes of varying sizes throughout the hat which had the potential to look cool.

There are some patterns for nightcaps out there, but as most call for a much heavier weight yarn, they were essentially useless to me in this case. Luckily this shape shouldn't be too difficult at all.
Brim Complete
I started with a ribbed brim with enough rows to go around my head comfortably, then slowly tapered off. These hats can be a range of lengths, so I knew I could just keep going as I saw fit until I was out of yarn. That is excellent since I wanted to finish this skein in one go.
About 5 inches into the hat body.
I got most of the way though the hat... about 13 inches from the brim, when I decided that two things were happening... 1) I didn't like how I had tapered off. It visually looked like I had tapered off, then widened, then got smaller again. 2) I was pretty close to the end and still had a lot of yarn left. I knew I wanted to make a pom for the end, but still...
Here's the taper off I didn't like...
Once I started over from the 5 inch mark I made a more gradual decline in size. This made the hat a little longer, meant I would use more yarn in the wider rows, and make a nice triangle shape.
Finished hat with brim folded up. You can see the slight jog in color at the seam.
The pom was pretty fun too. The way the yarn stripes I got a striped pom as well!
Finished hat, brim down.
I'm not sure I can recommend making one of these with this thin of yarn. It was pretty tedious and slow going, especially when worsted or even a light worsted would go so much faster. Still I am happy I used the yarn I got for something cool. This would look adorable on a kid, I have to think. If you are interested in buying it, let me know. It does fit me, but it's pretty snug.

Size: 9" wide at base, 22.5" long from brim to pom
Difficulty: Intermediate
Time to complete: 10 hours

Rainbow Striped Nightcap Pattern
Ribbed Brim:
Chain 16
Row 1: 1 sc in second chain from hook and each ch to the end. [15 sc]
Row 2: In back loops only, sc in each across. ch 1 and turn. [15]
Repeat row 2 until work fits around head comfortably or 18 in u stretched or approx 20 inches slightly stretched.
Ch 1 and Slip stitch first row to end of work creating a circular band. Ch 1 and turn to start working on the long side. 

Hat:
* Notes: Always slip stitch to first and ch1 before next row. It is about 3 rows for 1/2 inch, 6 for a full inch, if using the same weight of yarn. This was a little snug on some people so you might want to do more sc around the brim than I started with. 

Work sc around brim as appropriate, I did 104 before joining with a slip stitch to the first. 
R1:104 sc around
SC around until it reaches 4 inches in height from the first row. (not the brim)

R2: [12sc, dec]*   [91]  (7 times repeated around)
SC around for enough rows to have 5” from the brim. 

R3: [11 sc, dec]*   [84]   
SC around for enough rows to have 6.5” from the brim. 

R4: [10 sc, dec]*  [77]
SC around for enough rows to have 8” from the brim. 

R5: [9 sc, dec]*  [70]
SC around for enough rows to have 9.5” from the brim. 

R6: [8 sc, dec]*  [63]
SC around for enough rows to have 11” from the brim. 

R7: [7 sc, dec]*  [56] 
SC around for enough rows to have 12.5” from the brim.

R8: [6 sc, dec]*  [49]
SC around for enough rows to have 14” from the brim. 

R9: [5 sc, dec]*  [42]
SC around for enough rows to have 15” from the brim. 

R10: [4 sc, dec]*  [35]
SC around for enough rows to have 16” from the brim. 

R11: [3 sc, dec]*  [28]
SC around for enough rows to have 17” from the brim. 

R12: [2 sc, dec]*  [21]
SC around for enough rows to have 18” from the brim. 

R13: [1 sc, dec]*  [14]
SC around for enough rows to have 19” from the brim. 

R14: [dec]*  [7]  At this the row was small enough that I skipped the slip stitch to first and chain and just started working in the round. SC around for enough rows to be happy.  

R15: dec around to close end off. Bind off. 
Use the rest of the skein to make a pom for the end and attach it.  

June 22, 2015

Pink, Purple & Black Baby Blanket

I made a few fish hats for my hairdresser's grandkids a while back and of course she hears about my latest projects every three months or so when I visit. So during one visit she mentioned having a baby shower to attend and asked if I could make a baby blanket for her to give as a gift in exchange for doing my hair in the future. Sounded cool and I took the job.

It happened that I was visiting Houston shortly after and I decided to swing through Twisted Yarns on the way home. They have such a good range of Cascade products and I love to use it whenever I want something a little nicer. This blanket we wanted to be more a long term use blanket and not strictly a baby blanket. They had a ton of colors in Cascade 220 Superwash Sport, which is a little thinner than the yarn called for in the pattern, but I think it will make a nicer finished product. Bonus: it is machine wash and dry!

Speaking of patterns, I am going to use the Chevron Baby Blanket by Rachel C. which is free on Ravelry. I really like the overall shape it makes while being kind of modern looking. This way the new daughter in question can use it for a long time.

Colors asked for were pink, purple, and black. I feel like that can be kind of a harsh color set so I tried to pick colors that were a little softer and that would age well. I wanted to stay far away from that zebra and leopard print color schemes you see sometimes for girls... stuff like that is the worst.
Colors (L to R): Black, Royal Purple, Pale Lavender, Strawberry Cream, Raspberry
I needed eight skeins, but had 5 colors picked out so I got one of each and two of the main three colors. This means I need to plan out my striping, but I was going to anyway, so no biggie. I tried quite a few different patterns out of small thin stripes alternating orders, but it looked a mess on my screen and hurt my eyes. Eye hurt is not what we are going for. So instead I opted for a large color block chevron pattern.
Pardon my wonky chevrons and colors, but you get the idea.
Once I had the order down, I set to work. They way I have it laid out, also works perfectly with the skeins I bought. One full skein of black, then both royal purple, then the full lavender, the full strawberry cream, both raspberry, and the other skein of black.
First skein of black and two pink complete.
The pattern itself is astonishingly simple. It is a single row that is worked over and over. Once you've got it down, no reference to the pattern is needed, which is really freeing. I cannot get over those lovely straight vertical edges. As any crochet person might know, double crochet rows often have an odd hole at the end and slightly offset edges. This pattern has a little trick from MamaChee at the ends to get really crisp edges at the end of each row.
Great mobile project. Looks crisp and modern I think.
Each of my skeins made about 10 rows of color. From there I could estimate how large this would be. Finished size is 27" x 39", which I feel is a little on the small size, but it is really stretchy. I could have probably blocked this out larger.


I like the light and portable nature of this blanket. It is a perfect lap, car, or throw blanket for an adult, so I have to think it will be perfect for a baby/toddler for a while. Fingers crossed that they like it.

Difficulty: Easy
Time to complete: 25 hours

June 15, 2015

"Dark Side, No Moon" Socks Failure

WARNING: Long post. TL;DR: Cool sock yarn, attempt number one fails due to gauge issues, attempt the second fails due to yarn issues. Socks scrapped and yarn awaiting new pattern.

You might remember that at Fiber Fest, I purchased this really great color-way from Fishknits called "Dark Side, No Moon" of a self striping sock yarn. I had a pattern in mind when I bought it, but after looking over the sizes it made, I was worried that none would fit. After hitting up Ravelry, I found a new free pattern by Paton for Toe Up Socks. Not only did they look like nice, simple socks, but their size measurements seemed like the Women's 7/8 would fit me nicely.
Looks so cool, no?
I am not sure what the 7/8 part of that size means (and I hope it is NOT shoe size), but the length of 10.5 inches is a little larger than my foot so, fingers crossed for it to fit! This is probably a good time to mention that this will be the first pair of socks I ever made!

Working with the D hook is tiny and hard to see, especially since the skein starts with black. A good strong light was needed for this project. I also found that I really needed to pay attention as I quickly messed it up in the first 8 rounds or so, adding an extra stitch at the end of the rows and having to rip it out...
A toe cap!
Which brings me to the fact that this sock is worked in rows... I guess I understand why... but at the same time it makes a seam which I can't think will feel good under my foot. For now I am going to make the socks following the pattern, but I can't help but feel like perhaps working it in the round continuously might make for a nicer foot-feel.

In any case, I love the yarn. The ply is wonderful and the tiny bit of sparkle is nice. I can tell already that the striping colors are going in a standard ROYGBIV sort of order, which is very cool if a bit boring. I was hoping I guess for a more random color order, but they did not have one worked up, so it was hard to tell when in the hank.
Colors look great.
I got about 4 inches into the foot when I realized I forgot to make a gauge swatch... OOOPS. I measured on my work to see the gauge and realized that I was an inch smaller in both directions. Instead of a 4" square, their numbers got me a 3" square. I am using a different brand yarn than the pattern calls for, but it says "Fingering" weight on the label, so it shouldn't matter. I tried the sock on and it fit pretty perfectly, so I decided to just keep going. I am now worried about yarn usage though, since more stitches per 4"square means I will need more yarn than I thought.
Got several inches into the ankle after this pic before scrapping it.
I got all the way through the foot. Bound off and got about 2 inches into the ankle when I realized I was running out of yarn. So obviously it is as I thought and that my gauge being off was using up the yarn too fast. I could have bought another skein but this one was 438 yards which is more than enough for a pair... also at $26 a skein I couldn't bring myself to make a $52 pair of socks... they go on my feet for crying out loud.

My husband suggested that I finish the sock and then frame it as a monument to my hubris.
I ripped it out.
_________________________

For attempt two, we are changing this thing up entirely. New pattern, new hook size, new pattern size. I am still using a free Paton's Family Crochet sock pattern, but this time it is worked ankle down to toe. Since I'm going to a larger hook, I'm going to make the Women's L5/6 size this time and of course try it on as I go again.

Ok, first things first... make a gauge swatch. Pattern calls for 22 sc to equal 4 inches. Pattern called for a D hook which I used last time, so I tried a larger E hook... still half an inch off. Went out and bought an F hook, made my gauge swatch and it looks to be a tiny bit too large?!

I went and read through the posts with this Panache yarn on the Fishknits Etsy store and it says that the Panache yarn is a two ply. That actually puts it into the lace yarn category, not fingering weight. So that is probably why I can only achieve the gauge with a large hook than called for... because the yarn is thinner. My F hook gauge swatch being a little too large is probably due to the yarn being all bendy from being ripped out.

With those problems sorted out. I got the ankle ribbing done and started work on body of the sock above the heel. I got about three inches down and decided to see if I could pull it over my foot onto my ankle like a sock. Which as you might have guessed did not happen. I'm assuming that since the yarn doesn't have a ton of stretch to it, that the body just isn't going over my heel. The ankle ribbing fits fine. Maybe socks are a thing you need to custom make for your foot and not follow a pattern except in loose terms.

In any case I have scrapped this second sock as well and am going to try to find some other use for this yarn. Bummer, but hooray for learning.

June 8, 2015

Sister's Slouchy Hat

It's kind of amazing that this post is scheduled for today when this project was made in April... I do like having a buffer of posts, but it makes me feel less topical. Oh well.

My sister asked for a "slouchy bohemian hat" for her birthday through a cunning use of nudge nudge hint hint texts. I sent her a few patterns I saw online, she sent me a few pictures of stuff she liked, and we worked it out. She wanted it in black.

Black is a tough yarn color to use as it is kind of hard to see both what you are doing and the finished design. I decided to make the Eithnie Cabled Hat from Alyse Crochet on Etsy after seeing it on Ravelry. The large cable design should read well I hope and the overall shape was close to what she had asked for.

The pattern calls for a DK weight yarn, but as most retail stores do not carry any, I went with Lion Brand's new yarn, Modern Baby, in black. Baby yarn?? Hear me out here... it is rated a Light/3 weight just like a DK would be and is very soft. This yarn also has an amazing braided looking ply to it with just a tiny bit of shine. I'm really thinking this is going to turn out nice. I got two skeins to be sure I had enough, since we plan to make the brim about twice as wide as the pattern shows. I made up a gauge swatch as soon as I got home with my H 5.00mm hook and it matched up perfectly!

There is a bit of a disclaimer on the beginning of the pattern about this being advanced, but after doing two other cabled hats, I felt comfortable going in. That said, I did have to rip it out almost to the start after row 4 since I realized I was doing hdc instead of dc... probably because my last project was entirely hdc and my muscle memory took over.
Close up of the cables.
Every row is different. That means I had to pay close attention to what I was doing. I even used a stitch marker to mark when I came to the end of the repeat section on the rows to make sure I didn't skip anything. Also, a "front post treble crochet back cross" is a thing that is hard to wrap your fingers around.
Center of back.
I got most of the way though the hat, just before the brim rows and after putting it on my head decided it was not slouchy enough. So since the row before the last is just like one I have already done, I back-tracked into the pattern and decided to do a few more rows of cables before the brim.
Motif really starting to show now.
I had to make up new ending rows into the brim since I didn't want to do a full third motif.
Once I got back to the brim I also did more rows than called for to make a wider brim. That also helped it to slouch more.
Finished!
Overall the hat is really cute looking. It is a pretty light which is good because I was worried the slouch would slowly pull it off your head all day. Not sure it is as big and oversized as she would have liked it to be...but I hope she still likes it.

Time to complete: 20 hours
Difficulty: Advanced is correct.

BONUS: She did like it a lot!


Update: Made a second one for my mom. Her's is made with Red Heart Super Soft in Teal. It is a thicker yarn than the baby one and I used a larger hook for the hat as well. Should make it just a touch larger overall. Since both the hook and yarn were larger, I did the pattern as called for without the extra rows that I added to my sisters. Love how the pattern pops in this color.


June 1, 2015

Heart Scrapghan

A good friend sent me a cute picture of a blanket on Pintrest. I quickly hunted down the pattern on Ravelry and took the job of making her one. The Little Heart Scrapghan by Julie Lapalme is a great leftover yarn consumer. The pattern costs $4.00.

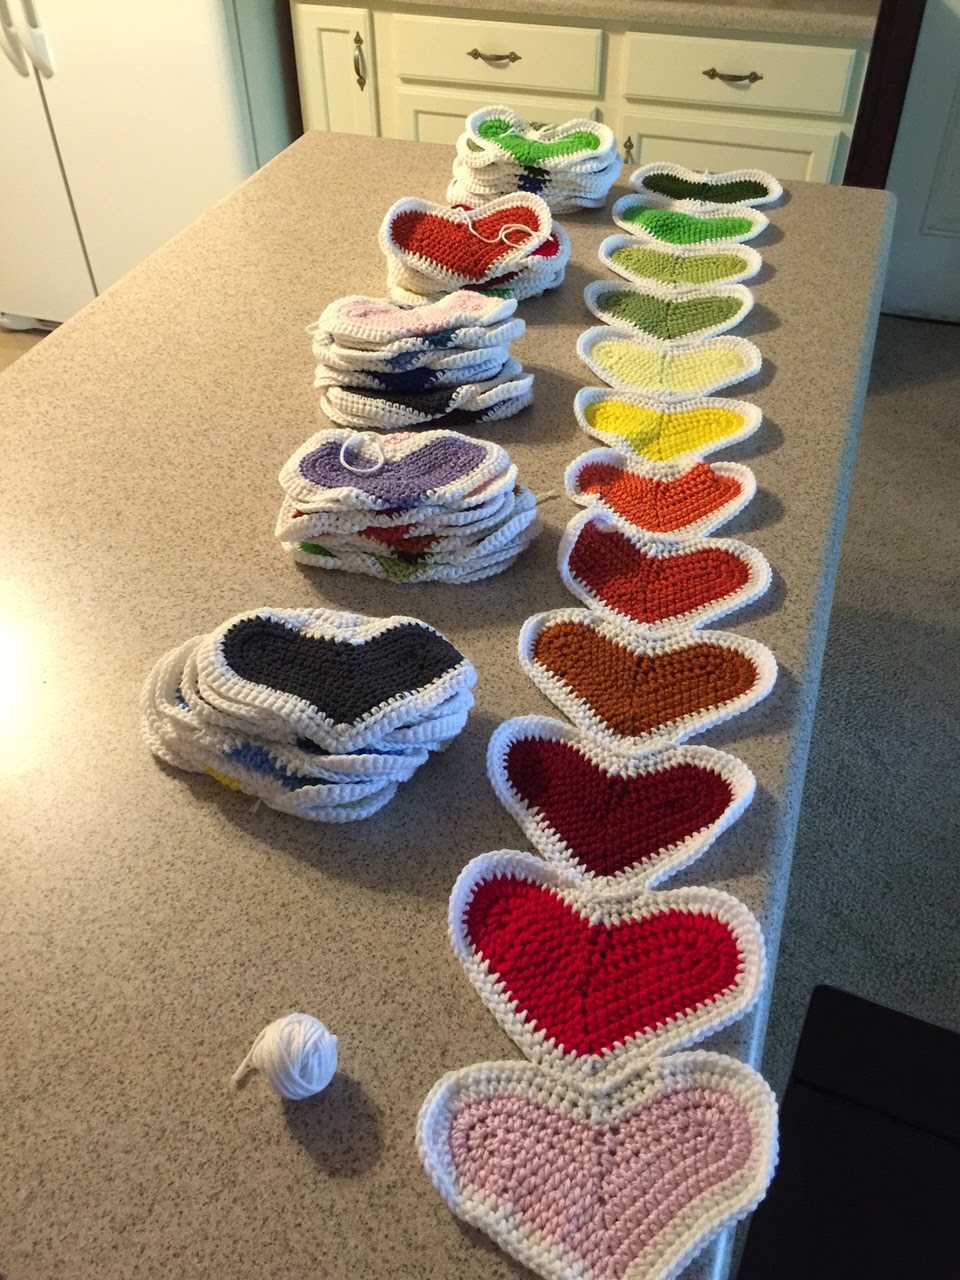
I went though my stash and pulled out leftovers of 24 different colors. My goal was to make three hearts in each color I had, to give a good variety and reach the 72 heart motifs needed. I made the first heart as written and as others mentioned on Ravelry, did not like the holes it left in the center. So I used some of suggestions in the comments to modify the heart pattern. I made the color parts first of each and every one first. At about 25 minutes per heart x 72 of them, thats about 30 hours for the colored parts alone, but I spread it out over a two weeks by setting a goal of making 6 hearts a day.

72 colored hearts
Once done with the colors I got a big pound ball of white by Loops and Threads to make all the borders on each. Adding a border to a heart took about 10 minutes a piece (x72 = 12 hours) Before I started the first border, I laid out all the hearts in columns as I would want them to be when done. This is because rather than sewing them all together when done, I was hoping to attach them in columns as I went along. Then I would only have to sew up the columns into the blanket rather than every single one...

I could have kept reworking this layout all day...

Unfortunately trying to connect as I went along did not work. The seam it made was very uneven and that would have made for a very bumpy blanket, so I followed the instructions to leave a tail to sew them together with. It was a bit painstaking and linking up just the rows of 12 to each other took about 2 hours each (x 6 rows = 12 hours). Laying them out like this was important though to make sure the finished blanket would look nice.
All columns complete and ready for attaching.
Once the long strips are done you then sew those up in a kind of offset pattern. This was even more painstaking, but it helped a great deal to lay them out flat on the table while sewing up. In order to not have a billion ends to weave in, I cut long pieces of yarn about 1.5x the length of the column of hearts and sewed at the points where directed and then wove through the edging to the next connection point. That way I only had to bind off and hide the ends at the top and bottom. Sewing the strips together took another 3 hours. Once all the strips had been connected, I was finally done!

Detail shot of columns sewn together.
The finished blanket measures: 5 feet long by 45 inches wide.

I love how it looks. Since it has some holes between the motifs it isn't super-duper warm, but still does a good job of being snuggly. I also love that what was once two bags of yarn leftovers is now less than half a bag of small balls of yarn. These tiny scraps aren't enough for anything else really, but since I do amigurumi toys you never know when you'll need a little bit of a color for embroidery details.
Finished!
Total time to complete this blanket was about 60 hours.
Difficulty: Medium... no part is particularly hard, it's just a lot of work.