August 31, 2015

Blueberry Tea Set

The birthday girl asked me if I would be willing and able to make her a birthday present.

She had her eye on a teapot set that was a special run, however it being very cost prohibitive to afford, we set about making something instead. She bought an Arzberg Teapot and two cup and saucer sets from Crate & Barrel along with some food safe porcelain paint markers and I set to work.

The design on the one she liked, as you can see, has faded out watercolor dots of colors, ranging from dark blue to a pale blue with a few hints of yellow and purple. The markers she was able to get did not really have these exact colors, so we took our inspiration from it and did our best.

I started with the cups to see how it might look since they would be easier to replace, should we not like how it turned out. Once the cups were done, I did the tea pot and lid. I call these the blueberry tea set since when they just had the blue dots, it kind of looked like blueberries to me. We used four colors: a dark blue, a dark purple, green, and yellow.

The markers were a little tricky to handle and of course the only blue marker we had had a leaky nib. I would draw down the dots of paint and then used a damp q-tip to blot the center and pull the paint back up while it was still wet. That helped get the faded center, dark outline look. I put down mostly blue dots and tried to pull up more paint from some dots than others to try to make it look like we had more than one blue color going on.
the blueberry stage. 
After that I laid the purple, then green and finally yellow. Each dot would be blotted to get the same sort of overlapped watercolor look. The green was a bit distracting and not at all the dark leafy sort of green we had hoped for. After it dried I went back over each green dot adding a layer of the blue paint over the top and blotting it to see if it could change the green into a color we liked better. It worked and actually gave us a lovely sort of teal color, which we liked a lot better.

The paint actually dried to the touch pretty quickly, but was able to be scraped off still in this state, so I was able to remove some dots and smudges that I did not like.
Finished painting!
Some of the markers simply said to air dry, while the other set we bought said to bake in the oven to set the colors. So after letting it air dry for about 4 hours, I set them on a cookie sheet and put them in the cold oven, setting it to 320 degrees Farenheit and putting the timer on for 30 minutes. It could then slowly warm them and set the paint. After that I carefully took them out and let them cool off.
finished and dried, before baking
Not sure the effect is quite the same as the one she had her eye on, but I really like how these came out. Now that she has all these paint markers, I kind of want to go out and get a bunch of blank cups to draw on. I have to think that others would love one of a kind cups for presents!
after baking. think the colors lightened a little. or maybe its the light... still cool.
Difficulty: Intemediate
Time to Complete: 5 hours of painting, 4 hours of drying, 30 min baking

August 24, 2015

Appa Catbus Hat

After I made the latest set of Totoro fair isle hats, I thought I would do one more with a few other skeins of yarn I had on hand that I had no idea what to do with. I had though about doing a scarf, or a shawl, but with the three colors I had it might turn out a little odd.

The yarn in question is Cascade Superwash 220 Sport and I have three skeins, one each of Chocolate, White, and Extra Cream Cafe. I got these colors way back in October of 2014. Since it is a lighter weight yarn than I was using before, I knew my existing design grid would most likely be too small, but I tried to hash out a design anyway.

The colors themselves are pretty perfect for representing a few other cartoon characters I like: Appa, from Avatar: the Last Airbender, and Catbus, also from My Neighbor Totoro. These two creatures are many legged modes of transportation in their respective shows, so they have a lot in common in my mind. It was fun to put them together in something finally. These skeins also do not have a lot of yardage so I figured I could use most of them up in this project.
scrapped pattern for 84 stitches
The yarn calls for a 4mm hook, but knowing I work very tightly, I went with one of my old G 4.25mm hooks. I did the foundation row out to where it fit around my head nicely, then did two rows of waistcoat stitch into it. I did not bother with trying color changes or anything just yet, as I wanted to see how many stitches my grid would need to be to fit nicely and if I needed to go up to a larger hook size.
first attempt with 84 sc around. too small. scrapped.
Once I got a few rows into the first pattern for 84 stitches around I knew it would be too small and reworked the pattern for 90 stitches. There are a few small differences between the two. I made the letters a bit more obvious and changed up Appa's face a little. I also moved the heart motif to fill in a little more space. I also moved it so that it was not split up across the seam, which is a good idea in theory, but looks bad in real life.
reworked pattern for 90 stitches around.
I worked on this hat for about three weeks I would say, off and on. My hubby was nice enough to snap a pic of my setup on our flight home from a weekend family reunion.

After getting through the entire design section, I think if I had to do it over I would work in a 5mm H hook just to make sure I don't get too tight. This hat fits, but somewhat tightly through the center where I forget myself and tend to work tight again.
several rows into the new design
Since I pretty much ran out of the cream cafe (tan) after the design section was done, I did one more row solid tan to be like row 4 and then closed off the hat using the dark chocolate brown to mirror the brim. I then finished the hat off with a white pom on top.
design areas done. love the heart detail
As with the very first of these hats I made, I feel like I could have done a lot of things better. This new yarn, was almost like starting this idea from scratch. I think in the future, I will start these hats in the smaller size, then when getting into the design area, move up a hook size to one larger. That might keep it from getting too tight to wear. (So in this case, start with a G hook and move to an H hook at row 4.)


This hat is super cute in my opinion, just needs to go to someone with a smaller head than me. I love the Appa best I think... Maybe next one I put Momo on the other side.

Difficulty: Intermediate
Time to Complete: 15 hours

August 17, 2015

Third Jumping Monkey

Three little monkeys jumping on the bed... I hope none fall off and bump their head... Think she's got her hands full with three monkeys as it is, without needing to go see a medical professional.

Same pattern as the last two times... but it has been a while since I've made it. As before the sex will go unknown until birth so this time I went with Red Heart Soft in chocolate for the body. Used some leftover tan for the ears and face, and gave it a striped yellow and white shirt. Again, easily modified, if it should be a girl.

It was refreshing to work from a pattern again. Making stuff up is hard, writing it down as you go along is harder. Pattern calls for a 3mm hook, but I don't think I used that small either of the last times. For this one I used a 4mm hook, which is really too small for the yarn, but it certainly made for a nice tight fabric.

Once again I had some trouble with the snout area, so this time I wrote the oval shape out as I liked. I've also run out of larger safety eyes, so these are buttons, which I do not recommend using for small children, but whatcha gonna do.

cute.
Time to complete: about 8 hours
Finished Size: 11" tall
Difficulty: Easy

August 10, 2015

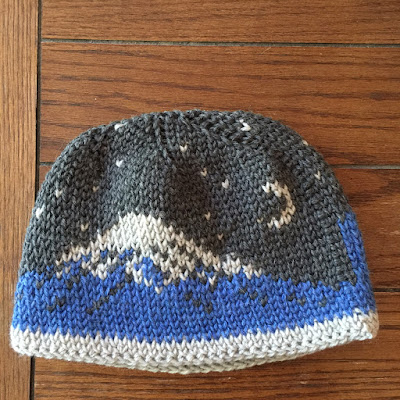
The Great Totoro Wave

After the last totoro fair isle hat, I still had more yarn, and my mom had said she wanted one too. She didn't have any specification on what she wanted on it, so I decided to try out the Totoro wave pattern I had mocked up.

I made this pattern a tiny bit taller than the last one, since I feel like maybe I should have more design and less edge on these hats. As with most things the more you make, the better they get.

With these large images of the Mount Fuji and this one with the wave, I wonder if the scene gets lost since it wraps around and you cannot see the whole design at once. Like maybe someone behind you will wonder why there is a big blue triangle on that person's hat... I guess that is why repeating motifs are more common in fair isle, since the design is the same from any angle.

While working on this one I went a lot faster than last time, mainly because I was itching to move on from hats into my next plushie idea. Day one, I spent about 4 hours working and got halfway through the design.

I finished the rest of the design in another two three hours or so. At that point I needed to start decreasing around. In the last few I have carried the white along to make stars in the sky, but for this one I needed to keep it to finish off the crest of the wave. If I had tried to include it in the flat part of the design it would have been way too deep of a hat.

I just eyeballed where I felt I should have the white crest start and stop to get that curved look over the next three rows of my decrease rounds. After that I stopped with the white altogether and just did the rest of the closing off in gray.


After hiding the ends, I asked if she would like a pom on the top. I don't have an opinion on them one way or the other, but she thought she would like one. I decided to go with the white and blue colors to maybe make it look like a splash of water, not sure the effect is really there, but it looks cute.


Difficulty, as with all of these hats, is Intermediate in my opinion.
Time to complete: 10 hours

Previous in the set:
Three Totoros & Mt. Fuji
Nighttime Hooting Totoros
Winter Forest Totoros

August 3, 2015

Three Totoros & Mt. Fuji

This is the third Totoro fair isle hat I have made.

A friend's mom collects images of Mt. Fuji and saw my last Totoro hats and asked for one of her own. I think this hat will be super cute to add to her collection of Fujisan images. She asked for it to fit a head size of 23 inches, so made it a little looser than the last one, which was already larger than the first. It is pretty much necessary to get it to fit nicely, since as I mentioned before there is NO stretch to the yarn or the fabric it creates.

I'm working again with a 6mm hook, but trying to be mindful of working loose on the hook. I started with a foundation single crochet 72 around. Then increased up to 78 (11sc, inc around) in the second round. For Row 3, I started working around in the waistcoat stitch. Overall, I added another row to this design since the last ones I felt were a little short and I ended up putting a few brim rows on so that they would cover your ears.
you can see the carried along yarn inside
I needed to get a little extra yarn for this hat since I was already working on leftover yarn from the first two. As it is, I have a fourth Totoro fair isle idea in the works that will use up what was left from the new skeins of this third hat.
almost done with the design rows
This time instead of bundling the two other stands into the back of every stitch, I used more of a knitting technique of picking up the other color strands every three or four stitches. It made the fabric a little lighter overall I think, and certainly less stiff. I do worry about the exposed yarns snagging on bobby pins or hair clips, but hopefully it will be ok since she has short hair.
starting to decrease
This hat was a little slow going like the others and it is kind of a pain to keep the colors from tangling since you work with three at once. I feel like I should come up with some sort of toilet paper holder rack to put the three skeins on so they can spin in place. In any case, I finished it in good time I think.
Totoro side

Mt. Fuji side.
As before I added a few more white pips of stars in the decreasing rounds. I didn't think a pom on the top would look right for this hat, so we left it off. Overall I am pretty happy with how this third effort turned out. Think I've got it to a good size to fit many heads and a good space to work out designs.

Difficulty: Intermediate
Time to complete: 15 hours